

A part score can be a big deal

The casual bridge player rarely gets excited over the result of a part-score deal, which is not entirely surprising. One would not expect a player's heart to hammer over the struggle to make a partial as it does when some 1,500 to 2,000 points hang on the success or failure of a grand slam. After all, how much is a part score worth?
Not even the experts are sure. They do know that it is worth more than the bonus of 50 points awarded to it in duplicate, where a partial can yield as many match points as a slam. But what about the value of a partial in a rubber game? Swiss expert Jean Besse, one of the world's best players, once kept a record of more than 1,000 part-score situations and came up with an estimate that a score of 40 or more really was worth an additional 90 points when not vulnerable, 110 points when vulnerable against non-vulnerable opponents and 220 points with both sides vulnerable. And there are some who consider that these figures are on the low side when taking into account players who overreact when the opponents already have a part score.
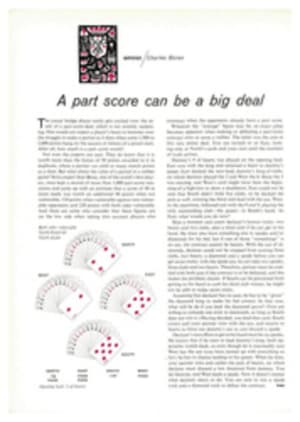
Whatever the "average" figure may be, an exact value becomes apparent when making or defeating a part-score contract wins or saves a rubber. The latter was the case in this very pretty deal. You are invited to sit East, looking only at North's cards and your own until the moment of truth arrives.
Dummy's 9 of hearts was played on the opening lead. East won with the king and returned a heart to dummy's queen. East ducked the next lead, dummy's king of clubs, on which declarer played the 2 and West the 6. Since the 3 was missing, and West's card might have been the beginning of a high-low to show a doubleton, East could not be sure that South didn't hold five clubs, so he ducked the jack as well, winning the third club lead with the ace. West, in the meantime, followed suit with the 8 and 9, placing the only outstanding club—the queen—in South's hand. As East, what would you do now?
Stop a moment and count declarer's known tricks: two hearts and two clubs, plus a third club if he can get to his hand. He must also have something else in spades and/or diamonds for his bid, but if one of those "somethings" is an ace, the contract cannot be beaten. With the ace of diamonds, declarer could not be stopped from scoring three clubs, two hearts, a diamond and a spade before you can get seven tricks; with the spade ace, he can take two spades, three clubs and two hearts. Therefore, partner must be credited with both aces if the contract is to be defeated, and this makes the problem clearer. If South can be prevented from getting to his hand to cash his third club winner, he might not be able to make seven tricks.
Assuming that declarer has no aces, he has to be "given" the diamond king to make his bid correct. In that case, what will he do if you lead the diamond queen? (You are willing to concede one trick in diamonds, as long as South does not win it.) Having decided, you lead that card. South covers and your partner wins with the ace, and reverts to hearts to force out dummy's ace as you discard a spade.
Declarer's next effort to get to his hand must be via spades. He knows that if he were to lead dummy's king, both opponents would duck, so even though he is reasonably sure West has the ace (you have turned up with everything so far), he has to chance leading to his queen. When he does, your partner wins and cashes the jack of hearts, on which declarer must discard a low diamond from dummy. You do likewise, and West leads a spade. Now it doesn't matter what declarer elects to do. You are sure to win a spade trick and a diamond trick to defeat the contract.
ILLUSTRATION
Both sides vulnerable North-South 60 North dealer
NORTH
[King of Spades]
[10 of Spades]
[7 of Spades]
[Ace of Hearts]
[Queen of Hearts]
[9 of Hearts]
[King of Clubs]
[Jack of Clubs]
[7 of Clubs]
[Jack of Diamonds]
[6 of Diamonds]
[5 of Diamonds]
[4 of Diamonds]
WEST
[Ace of Spades]
[5 of Spades]
[2 of Spades]
[Jack of Hearts]
[8 of Hearts]
[7 of Hearts]
[2 of Hearts]
[9 of Clubs]
[8 of Clubs]
[6 of Clubs]
[Ace of Diamonds]
[3 of Diamonds]
[2 of Diamonds]
SOUTH
[Queen of Spades]
[6 of Spades]
[3 of Spades]
[10 of Hearts]
[6 of Hearts]
[5 of Hearts]
[3 of Hearts]
[Queen of Clubs]
[10 of Clubs]
[3 of Clubs]
[2 of Clubs]
[King of Diamonds]
[8 of Diamonds]
EAST
[Jack of Spades]
[9 of Spades]
[8 of Spades]
[4 of Spades]
[King of Hearts]
[4 of Hearts]
[Ace of Clubs]
[5 of Clubs]
[4 of Clubs]
[Queen of Diamonds]
[10 of Diamonds]
[9 of Diamonds]
[7 of Diamonds]
NORTH
1 [Diamond]
PASS
EAST
PASS
PASS
SOUTH
1 NT
WEST
PASS
Opening lead: 2 of hearts